Saturday, October 22, 2011

Hope Fall Fun Fest 2011

We had a blast at our church's (Hope) fall fun festival this Friday (Oct 21st). So much to do, not enough time!! Here are a few pics we snapped along the way..


Lots of inflatables-- this giant tiger was a favorite of Deacan's. He had to do 3 times:)


This ladder was also tons of fun. The best part was jumping off at the end!!


So glad Poppa was able to join us when he got off work. He made a cozy arm chair while we watched the Illusionist. :)

Deacan enjoyed feeding the goats and seeing Llama Llama..


Lots of fun games and candy!! Mom is already tired of picking up wrappers and it isn't even Halloween yet..


The grand finale was the firework show which was amazing!! I will go as far to say it was even much better than the ones downtown on the 4th. I so wish my camera hadn't ran out of battery power at that time. The look on Deacan's face when lit by the fireworks while being held by Poppa was priceless (and not captured on film--BOO!).

What a fun time! My only regret is not enough time for lazer tag and that stinking camera battery!! Next year I will make sure to power up that battery..

Sunday, October 16, 2011

Zoo day with Grandmother Betty:)

What a perfect day to go to the zoo!! And what a fun family outing!


The animals were out and amazing.. God's work throughout creation is remarkable!! So many species, such detail and beauty!!


bit

Next time we will bring a picnic lunch, although we did enjoy a wonderful lunch elsewhere, afterwards. We were a bit hungry and Deac was losing interest by the time we passed Cat Country. Note to self: skip the bird emporium on the front end and see it later if time/patience allows.. All in all, it was a lot of fun! Looking forward to going back and seeing the lions. Oh, I almost forgot about those wax animals you can buy via machine!! I so need to look for those next time! I can smell them now:)

How to make an Autumn Leaf Wreath


I wanted to take Deacan on a nature walk to collect pretty fall leaves. The only question: what to do with them? We decided to make a wreath for the front door. This project was so easy and fun! All you need is cardboard, glue, scissors, and a pile of autumn pretties.
You will need to cut out a cardboard circle with a smaller circle cut out of the middle. As you can see in the photo, I tried to get precise with the measurements but gave up on that due to the thickness of the cardboard (or the dullness of my scissors.. haha). For a kiddie project, I thought best to stay loose and just go for it!


One of my favorite things about this project is that there are no stuffy rules. I do recommend putting the larger leaves on the bottom (like the giant one Deac is gluing in the photo). The idea is to completely cover the cardboard. I just let Deacan have at it, then went behind him and filled in the gaps. I did put a few "heavy" objects on top of a few stubborn leaves during the drying process (one of the "heavy" objects was a salt shaker..haha). After the leaves were dry, we glued on the acorns using thick puddles of Elmers glue, also the pinecone.

The final step is adding a hole near the center top of the wreath. I used a hole punch but a good old fashioned knife could get the job done:) Oh, let's not forget to add the yarn/ string. Violla!! Now, you have a sweet splash of Autumn's brilliant color right at your doorstep:)

Now that I've previewed this post I realize I really need a doormat..

Tuesday, October 11, 2011

How to make a Spider handprint Craft (easy!)


I just love making these with Deacan and the kiddos in my class every year. They are super cute and every parent loves a handprint craft:) I look forward to seeing how much Deacan's hand will grow throughout the years. I joke that he will be 18 and I will still be saying, "time to paint your hands black our the annual Halloween
craft". haha

All you need is black paint, paper, scissors, googly eyes, and a pair of hands. Simply paint child's right hand with the paint and press onto paper. Wipe hand (or wash). Next, repeat process with left hand, layering somewhat to match "legs" on the other side of the spider. Allow time to dry.

Once completely dry, cut out spiders, turn over, and tuck thumbs over. I like to tape them down. You can also write the year on the back of the project at this time.


Now just turn it over and glue the googly eyes on. I prefer Elmer's Liquid glue over a glue stick for this. The glue stick will not hold the eyes on as well. Just wait for the glue to dry and you have a cute Halloween (or should I say "Fall Harvest") decoration to enjoy year after year.


The spideys look really fun when laced into webbing. Even better if the webbing glows in the dark!! :)

Saturday, September 24, 2011

Deacan's 1st trip to the Dentist (and fun 4 that day) :)


Dude!! Thanks to CiCis Pizza's bubble gum machine-- Deacan needs major work!! Thankfully, the Bubba teeth are removable and he was able to have a fantastic check-up:)

We started off at Deacan's favorite spot: the library. So much fun reading books! We both love to read so much-- the library is a haven for us:)
Next stop, Dr. Garrett's office for his first check up/ cleaning.. We have had this appointment since February. Seeing as how this is September, I am more than thrilled to get this done. Also looking forward to seeing how his teeth are, considering all of the"special treats" he gets...

So brave and ready to go...


Seeing as how it was a special day, we decided to take the day off (no school
/work).


Deacan cleaned the teeth of a few stuffed clients on the way out


Deacan had an excellent check-up-- no cavities! Yay! I am happy to say we have brushed every night since the visit. I was very surprised he had no cavities due to the candy (and me slacking at making him brush at night!). I do not want to push our luck regarding the cavity issue...


Afterwards, we went to Michaels craft store, gave Grandma Tammy a kiss and flowers, and also had fun feeding the geese..


Last but not least, we hit Malco for Lion King 3D. SO AWESOME!! Maybe Mommy enjoyed it more than Deacan. My, the 3-D glasses have come a long way since the cardboard ones! It was actually 3-D!! So cool!!! And we were singing "Hakunnah Mattata" all the way home:) :) :)

Wednesday, September 21, 2011

A Day of Fun at Shelby Farms :)


What a beautiful day to spend at Shelby Farms! We started off with a very brief bike ride. Considered the paddle boats but Mommy decided it was too hot/sunny to propel solo.. Call me lazy; I call me wise:)

Next stop- the "Spidey Web".. The giant slides were a bit to hot. Deacan doesn't care much for the super cool swing area, although I think it is fun..


Next up, sand and water. If it was up to Deacs, we would stay there all day! He loves that area. My big complaint- no shade whatsoever for parents!!

That being said, it was time to get a water ice and a lemonade and head to the shady, more natural side of the park. Old school equipment and a lake-- I think we both had the most fun there:) Here are some pics we snapped along the way..

We even found some mussells. Yummy! :)


Our final stop was the horse stables. Although they no longer offer pony rides, we were able to feed the horses grass and Deac made a friend. :)


What a fun day! I don't know who had more fun-- Deacan or me:)

Saturday, September 17, 2011

Fair Fun!! "at the Agra-Chenter!!"

We had lots of fun at the fair this year. Deacan is now 42 inches (with his cowboy boots on and slightly on his tip toes). He was flabbergasted to ride better rides this year, his favorite being the Sea Dragon. I couldn't believe they allowed him on that thing but he loved it. He begged to ride it a 3rd time in a row but I thought that might be a bit much to a 4 yr old tummy!! His other fav: the haunted house. Guess he takes after his mommy somewhat:) He also loved the fun house, which he perused 6 times. Here are a few photos we snapped along the way...

Pony Ride!


The "human hamster wheel" was a blast! Deacan had a hard time getting it to really roll so Mommy got it and we rocked the casbah! It was quite a workout but so much fun!


Deacan was awesome at the games. He hit 3 balloons to win a light saber. He also won another light saber and a stuffed animal along the way.


We always enjoy the petting zoo. Although it is a bit sad..


Kiddie rides-- a bit boring.. but it's better than going home and going to bed on a school night!


That was so much fun! Deacan is already wanting to go back again. We had a blast. Although next year we will NOT see the 29 inch woman!! That one made Mommy lose serious sleep..

Wish I had taken some pics of the yummy fair food we ate. We had a corn dog, Italian sausage po boy, pork chops, and a funnel cake. All fair-alicious!! Best washed down with a $1 4-H sweet tea:)

Friday, September 16, 2011

How to Make and Can Peach Jam (without canning equipment)


There is something to be said for fresh jam. It is so sweet and filled with love. When making it, the "jammer" enjoys the experience of the process and the essence of the fruit. When receiving it, one is blessed with as much, if not even more:) So let's JaM... (without buying a canning pan or utensils)


First, wash the peaches thoroughly.. Easy peasey!


Wash the jars (canning jars at Kroger or WalMart- reasonably priced). While you're at it, put the lids in a pot at Low temp; do not boil them. It will deconstruct the reactive nature that helps them bind.


Peel, core, and slice your peaches. Enjoy the aroma:)

Add peaches and sugar to large pan. Bring to a boil and stir. Then add lemon zest, juice, cinnamon, and nutmeg. Boil for 15 minutes.


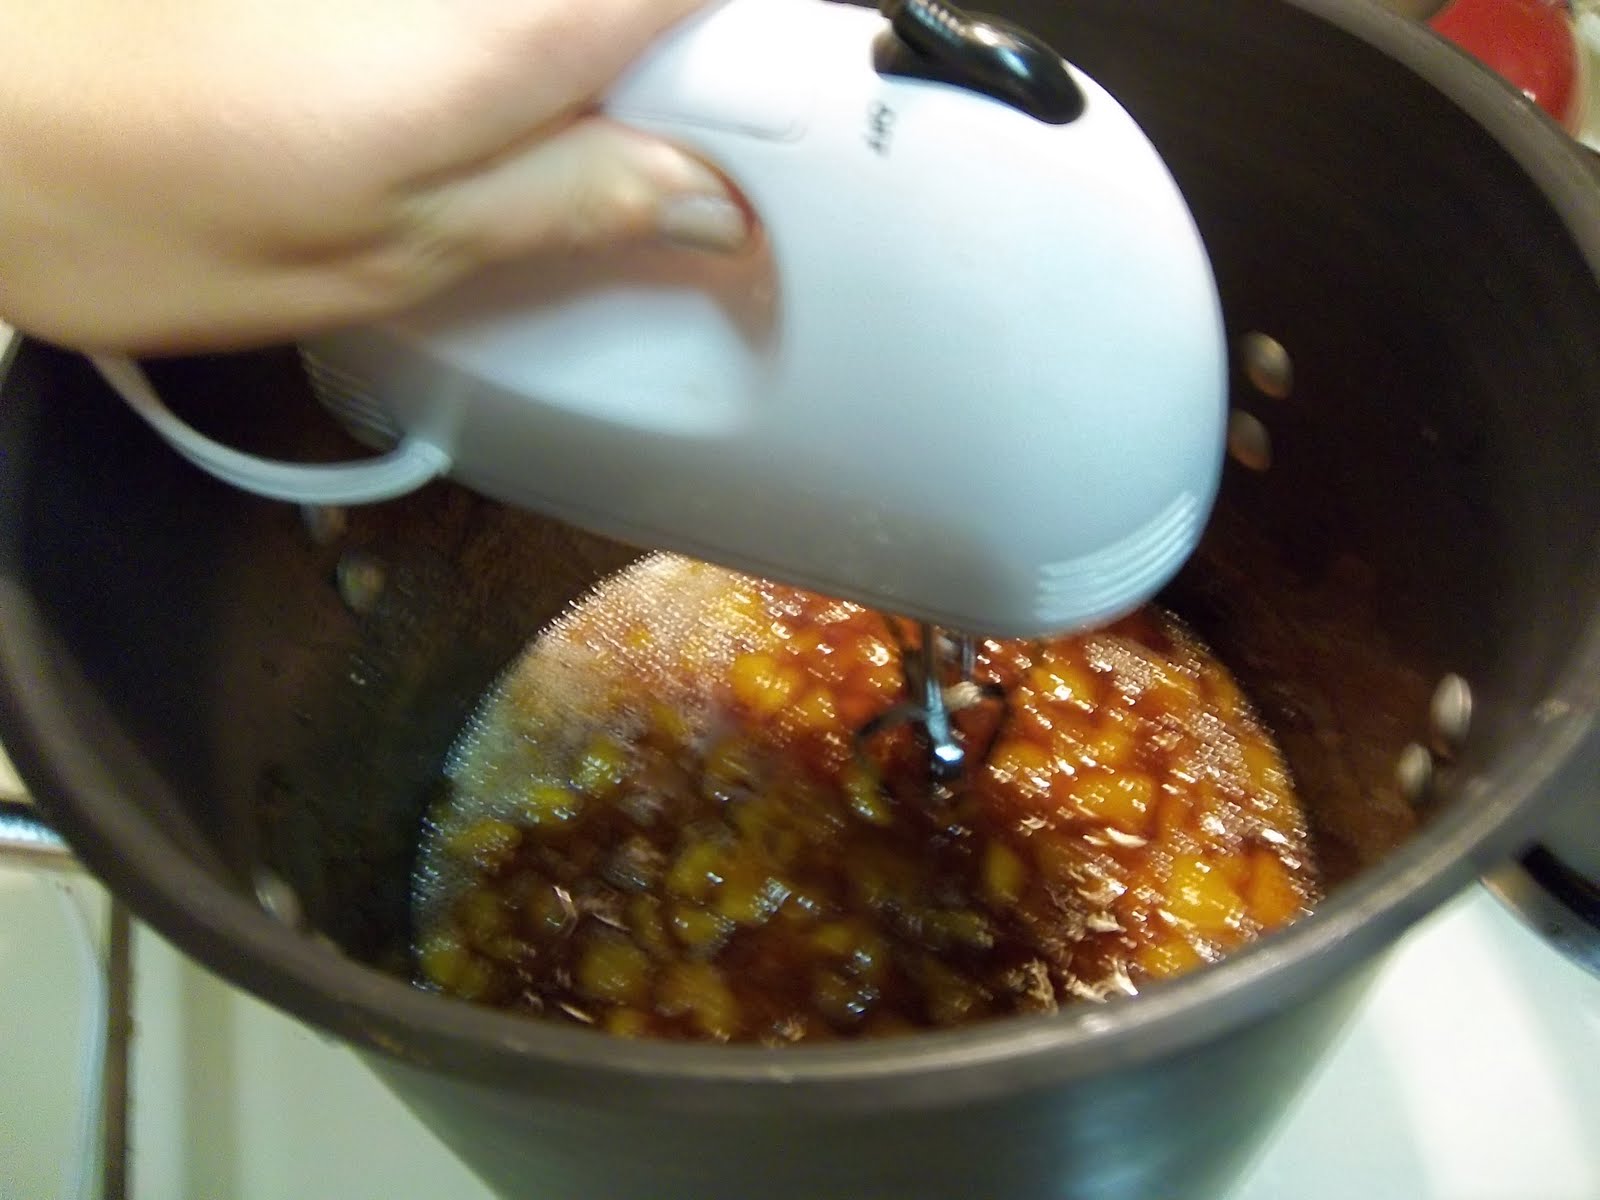
Ideally, you will have an immersion blender or potato masher for this step. I had neither, so I used a basic electric mixer (VERY carefully). The idea is to break down the fruit that did not do so during the cooking process. A left mine a bit "chunky".

Next, add the pectin and do a rolling boil for 5 minutes. Viola-- you have made peach jam!!


Pour jam in jars, leaving an inch or so for "breathing room". Make sure to WIPE RIMS THOROUGHLY before adding lids. If not, may the force be with you when trying to open them. haha

Now, simply prepare a hot water bath for your jam jars. You want the water on low heat and to cover the jars about 1/2 way up. When your water is at temp, proceed with the hot water bath and let the jars heat for about 10 minutes. That should be enough time for the lid to seal. Remove your jars using a pot holder (if you do not have a "jar grabber". The pot holder worked great for me. Check each seal, as one or two may need additional time in the hot water bath. If one fails to seal after the additional 5 minutes or so, just eat that jar first.


Now, label and pass out to your favorite peeps:)

Peach Jam

10 cups of peaches, peeled and chopped
6 cups of sugar
2 teaspoons cinnamon
½ teaspoon grated nutmeg
2 lemons, zested and juiced
2 packets (1 box) liquid pectin